Tag: equipment

  • My Podcasting Setup ~2011ver.~

    My Podcasting Setup ~2011ver.~

    Having done a first version and then a ~2010ver.~ a year later, after upgrading a few things, it made sense to follow-up with a… (wait for it)~2011ver.~ post. So how ’bout them podcasts, huh?

    When we last checked in on the setup, I was considering cleaning out one of the extra rooms in our finished basement to make a quasi-“recording studio”. The room was a moderate disaster of half-empty boxes and miscellaneous extra crap from when we first moved in, but it would likely make for a fantastic recording area — low ceiling, closing door, a desk was already there, and the wireless signal reached all the way down there from two floors up.

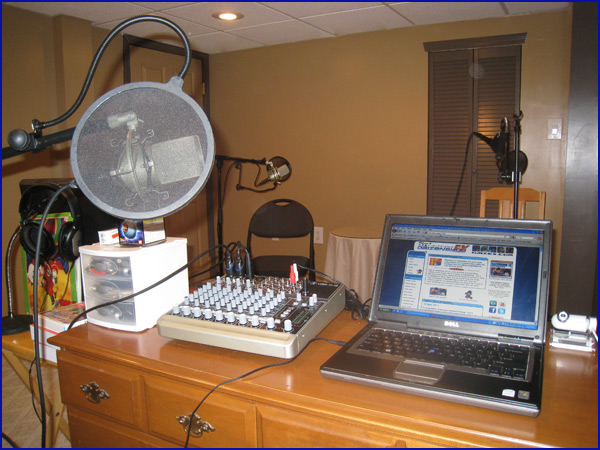
    Well, the room got cleaned out, and we have been recording down there for a few months now. I couldn’t ask for much better out of such minimal work! Here is an updated, general view of the area:

    With the overview done, let’s dig into the hardware! I again have to preface this by saying that I don’t actually know anything about audio or any type of engineering, so this is all self-taught, trial-and-error based on moderate research and reading. I’m probably doing stuff wrong, I’m probably doing it all inefficiently… but it seems to be working out so far. Take my advice and recommendations with a modest-sized grain of salt.

    One of the most important upgrades has been from the Behringer Eurorack UB802 (~$50-60) mixer to the Mackie 1202-VLZ3 (~$300) mixer. In addition to the two additional XLR inputs (which means no longer daisy-chaining something like Jeff’s mixer when he comes for a “Manga Review of Awesomeness”), I have much greater control over just about everything. It’s just an all-around better mixer. As I read in the reviews, I noticed a better sound with the same microphones I was already using, and there was a noticeable amount of less noise in the output signal — when tweaked properly, it is essentially whisper-quiet.

    The output is still going from the “Tape Out” via the Behringer U-Control UCA-200 which came with my work mixer — no, I’m cheap and still haven’t purchased my own stand-alone UCA-202 (~$30) or similar device. This is one area that I may eventually upgrade. I’m not sure how or what I will do, since a dedicated Firewire setup is above and beyond what I need, but it feels like there might be a better way to get the audio to the computer with even better clarity and possibly normalization. Currently, the U-Control takes over as the input device, so switching Windows’ properties for what handles “in” and what handles “out” lets me use that for input, while still using the laptop’s on-board sound for output to headphones (to listen to test recordings and/or anyone on Skype).

    Over on the microphone side, everything is basically the same as it has been for well over a hundred episodes. I am personally still rocking the MXL 990 condenser microphone (~$50-70), which is held up by a Samsom BT4 boom stand (~$40).

    Within the last couple episodes, I have been keeping a duplicate of that same setup around for the wife so as to avoid using the Shure microphone (see below). It’s not that it’s a terrible microphone, but if I have something that’s so much better, why not use it? Having identical microphones in use (instead of both a dynamic and a condenser) also seems to help the levels and who gets picked up how much on which microphone across the room.

    For when the extra microphone is absolutely necessary, I have at least tossed the Shure 8900 dynamic microphone (~$50) on an On-Stage MSA-9508 side boom (~$10-15) and gooseneck extension so it is far more adjustable in terms of position and comfort, instead of directly on top of the old RadioShack Heavy Duty Microphone Stand with Cast-Iron Base (~$30). The RadioShack stand with a larger mic clip and the boom extension also doubles as the Rock Band accessory of choice for guitar + vocals, so it all works out in the end.

    In terms of headphones, I use the simple but serviceable Sennheiser HD201 (~$20-30) headphones. They are closed-ear with a super long cord, and they sound crystal-clear enough for the recording quality that I work with every week, so I haven’t felt the need to go nuts in this area.

    You will probably notice some other stuff in the room that handles I guess what can only be called “logistics”. Perhaps you wonder how it is that we all read notes on the “Manga Review of Awesomeness” (OK, Jeff just uses his iPad, now…) or e-mails. Do we print out notes? Of course not! A second monitor mirrors the display from the laptop for others in the room to keep up with the general show outline. I am really tempted to put a flat-screen TV up against that wall on the left in the future, though — not only would it be incredibly bad-ass, but it would give the entire room a larger, more convenient view of the screen, too.

    To just wrap up this section of the post, here is my general view of the room each and every week:

    So what about the software and actual recording? Not much has changed in that area, except the effort I ask of my usual participants coming in over the Internet.

    Everything is still recorded and primarily edited in Audacity. 44 kHz, mono. Done and done. I also still use the Call Graph plugin to record Skype conversations, but rarely in the same way as described last time around. Previously, I would take its 11 kHz output with my own track in the left channel and other side in the right channel, kill my track, turn the other track mono, re-export it, and use that as the secondary audio track to edit with, which isolates the other side of the conversation and lets me cleverly edit around any inadvertent talking over each other, etc.

    These days, because all of the regulars (Julian, Heath, Jake, Corey, etc.) actually know how to use a computer, I simply ask them to record locally on their own side, as well — that’s the second track I use (after recording they send me the audio, usually as a high bitrate MP3, rather than the needlessly larger WAV). I still use Call Graph as a backup, and usually to line up the two separate tracks. I place my own local track up top, bring the Call Graph stereo track below it, and then the other person’s local track below that, line them all up, kill off the Call Graph track… voilà! It sounds far more complicated than it actually is — since Audacity lets you zoom in to insane degrees, I can line up the tracks to the tiniest fraction of accuracy possible.

    By not using Call Graph (never mind its 11 kHz limitation, despite its amazing convenience and other customizations), we avoid any of that traditional “Skype noise” — you don’t hear someone’s call quality drop with their Internet connection fluctuations. In addition to that, by actually editing the show, we can avoid any excessive talking over each other, usually done by accident due to minor audio delays — I will typically just say, “Oh hey, start that sentence again.” It’s little stuff like that which folks may not even specifically notice, but I hope makes an impact in the back of their head somewhere while listening and comparing to other shows.

    After editing the tracks (which have already been noise-removed prior to editing), I spit the product out to Levelator to even things out. I still bring everything into a project file in Adobe Premiere to line up the bumper music — it’s one of those relics I can’t let go of. The block-based dragging and snapping, along with a pre-edited bin of all the bumper music, makes it very easy to cut the sections apart. I usually leave a 10-second gap in between sections while editing to make it easy to visibly tell in Premiere where the sections need to be spliced with the jingles.

    I may upgrade the software some day (likely Adobe Audition), but I figure until I know more about how audio actually works, it’s not really worth sinking the money into software.

    About those other folks, though — what are they all recording with these days? Well, the two most relevant folks to note here are Julian and Heath.

    Julian uses the Elecom HS-NB01UBK (~$30) headset that he picked up over there in Japan. As you have been hearing lately, it catches the bass of his voice quite well. It picks up a fair amount of background noise, but I am able to kill that off with some basic filtering in Audacity well enough. Since I am editing with multiple tracks, that means I can also just silence out an entire area on his side if I need to. I ask that my co-hosts don’t rely on that and practice proper microphone etiquette and all, but at the end of the day, you cannot control when the little one decides to yelp!

    Then there’s Heath. Up until recently, he has been using whatever generic headset he’s had lying around (he tells me it was the Logitech USB Headset H530). You may have been able to hear it (even though I try to cut around it as much as possible), but it would randomly peak when he would start talking, and it picked up a rather huge amount of background noise — it’s the kind of headset that works fine for gaming and casual conversations, but not for podcast discussions. With all the great content him and I planned on bringing to the podcast in the future, this just couldn’t last. In response to some random chatter on Twitter, we made it known that we were looking to upgrade Heath to some actual audio equipment. Our buddies Lemmy and Ryan came through with some donations that covered it all… within minutes! Heath would really have no need for a mixer setup the way I have things, so we decided to go with a dedicated USB setup for just himself. In addition to a generic pop-filter and the same Samsom BT4 boom stand (~$40) that I use, we went with the USB version of my microphone: the MXL 990 USB (~$100-150). Unfortunately, the USB version of the microphone comes with just a little stand that would never work for the way we like to actually be comfortable while recording, so to complement the mic and boom stand, I sent him an old, only-semi-broken MXL 90 shockmount (~$35) that I had from my first microphone (I had since gotten a replacement as a gift). One of the screws was slightly stripped, and the inside rubber portion needed a little glue, but all-in-all it was in perfectly fine shape! Appropriately so, Lemmy wanted a picture of Heath’s new recording setup… and so did I for this blog post!

    Here’s what the good sir had to say about it:

    I’m loving the new setup, and the audio quality is SO much better! After messing around with things, this is the setup I finally settled on. It’s somewhat like what I was using before, only my Logitech headset is now replaced with my new fancy microphone and boom stand. The MXL 990 USB powered condenser microphone is plugged into my laptop on the left, whose only purpose is to record the mic audio in Audacity. The laptop is also used to connect to Skype if I’m recording with anyone else over the world wide web. I then use my personal desktop computer to look up references while recording; typically there’s Kanzentai on one screen and Daizenshuu EX on the other. I would record on this computer, but Audacity tends to crash once I hit the stop button. Luckily my mouse and keyboard are Bluetooth, so I can set the keyboard in my lap if necessary. Of course I just use my headset as head phones while recording. But more importantly, there’s usually a beer just to my right on the desk and there’s a mini fridge full of it behind me.

    So that’s pretty much where we stand. I don’t feel the need to really upgrade a whole lot more on my end, with the possible exception of eventually having four of the same microphones so even Jeff doesn’t have to bring one over. Oh, and some more folding chairs would be nice. Maybe a new desk eventually, too. And a mini-fridge for beer convenience. Do they make silent mini-fridges…?

    (NOTE: We did not consult each other re: mini-fridges prior to writing this…)

    I guess we should also treat Jake to upgraded equipment at some point in the future. Julian, too, if and when he ever makes his way back to the states.

  • My Podcasting Setup ~2010ver.~

    It has been over a year since I last wrote about and shared how the magic of podcasting goes down at Casa de EX. A lot has changed since then, but I just have not gotten around to writing up a new version. Our buddies over at the Unofficial One Piece Podcast asked the other day what we were using for a mixer, and when I pointed over to that blog entry, I realized just how out-of-date it was!

    So here we go. I am happy to present to you the ~2010ver.~ of “My Podcasting Setup“. As always, I do not claim to actually know what I am talking about. I am probably wrong with much of what I do, and writing about how I accomplish it is most likely only perpetuating bad habits and sharing mis-information.

    Oh, well.

    I have killed two computers over the course of doing the show for Daizenshuu EX. First I blew the sound card in our Shuttle, and then its power supply died. Both are easy fixes, but it just sits over there on the other desk because I have been too lazy to open it up. Once that went down, I shifted over to using Meri’s old desktop from ~2000/2001 as a secondary recording rig. I tossed Ubuntu on it, and as described in the prior article, I used it to line-out for a dedicated Skype track recording.

    All that is old hat.

    Over on the Mac, Jeff uses a great application called Übercaster to record us locally and any extra, isolated audio tracks (such as Skype, bumper music, etc.). I’m running a standard ol’ Windows XP install both on my desktop and my laptop, and I have gone with a little Skype plug-in called Call Graph. It just works. When running alongside Skype, it automatically records the entirety of a call once one begins, recording your own audio in the left channel, and the other side (be it a single person or a conference call) in the right channel, spitting out a stereo WAV (or MP3) the instant you conclude the call.

    Near as I can tell, though, it only records at 11 kHz — even if you tell it to record a 44 kHz MP3, it still records an 11 kHz WAV which it then converts to a 44 kHz MP3. This… is mostly serviceable. When you have folks like Julian who are just running a standard Logitech headset, anyway, the frequency of the audio file is not really taking much more of a hit than it already is due to the hardware. When we are done recording, I take the WAV into Audacity, split the stereo audio track, delete the left channel (myself), tell the right channel (Julian) to act as mono, and export the new, entirely-isolated audio track. Voilà.

    (If I am recording with someone who knows what they are doing, I sometimes just have them record locally on their own end and send me their final audio once we are done recording… though I always am recording a back-up just in case.)

    What about my own, local track, though? That I do not allow Call Graph to handle — I still record in Audacity at my standard mono, 44 kHz dedicated audio track. The two tracks (my own local track + Skype track) are easy enough to line up in Audacity for editing later on, either through a “1, 2, 3, clap!” or just from doing this for five years and understanding how a conversation is supposed to sound.

    I still use a combination of Levelator and Audacity’s built-in noise removal for my post-processing — nothing special there. I am also stuck in my own ways by using Adobe Premiere to line up the segments with their respective bumper music tracks for the final mixing and export. I just really like the block-based dragging and snapping for that final step, I guess.

    With that in mind, though, let us turn back over to the hardware.

    The driving force behind everything is still my Behringer Eurorack UB802 (~$50-60) mixer. It is a great, compact little guy with two XLR inputs, phantom power support, decent gain/volume control, plenty of line-in and out support, etc. The UB802 seems to go through phases of being available versus unavailable, but the standard Behringer 802 (~$60) is something I picked up for Jeff over the last holiday season, and it is essentially identical to my own.

    The main difference these days is that I have indeed jumped over to using a USB device to grab out the audio, rather than running an analog RCA-to-1/8-inch line-in cable. The Behringer U-Control UCA-200 actually came with the (larger) mixer that I use at work. It is their standard pack-in version with mixers, but the stand-alone UCA-202 (~$30-35) is what you will typically see for purchase online. I had spoken before about how the device takes over as the entire sound device for the computer — for example, I was unable to listen to the audio I just recorded through my headphones while it was plugged in. Once I stopped being an idiot and looked around a bit, I found that I could tell Audacity to still use the internal sound card for playback and use the U-Control device for recording, allowing me the same convenient usage I had always experienced.

    For any recording where we need more than two local microphones (such as a “Manga Review of Awesomeness” or something for vgconvos), I no longer daisy-chain the RadioShack mixer into the Behringer. Instead, I have Jeff bring over his 802 and daisy-chain that into my mixer. We use the same process of RCA cables going from “Tape Out” on his to “Tape In” on mine that would have been used from the old RadioShack mixer, but now it is done with higher-quality equipment. It still introduces extra analog noise that I would rather not have to deal with, however. I have my eyes set on the Mackie 1202-VLZ3 (~$300) mixer with its four XLR inputs and non-Behringer, genuinely-high-quality parts. Behringer stuff is “OK”, but I have had a few issues here and there with the mixers to the point where I probably will not buy their stuff again.

    Over on the microphone side, things are still pretty much the same… with the exception of what holds it for me. I am personally still rocking the MXL 990 condenser microphone (~$50-70), though these days it is supported by a boom stand. I am fairly certain it is the Samson BL3 (~$30), due to it not coming with a mic clip… but I no longer have the box to double-check that. Whoops. Sorry. The MXL 990 is just a tad bit heavy for it, but adjusting the three-legged support and balance of the boom extension will grant you just the right placement for comfort and not-falling-over-ness.

    The main reason that the microphone is hanging on its side is because I accidentally stripped the screw-tightening mechanism for the shockmount, and have not felt like spending the money for the replacement MXL-90 shockmount (~$35) just yet. When you can buy the microphone (which itself comes with a shockmount) for just a couple bucks more, it is difficult to build up the desire to spend money to replace one that is just hanging on its side and not entirely broken.

    Meri is still rocking the Shure 8900 dynamic microphone ($50). It is quite the handy mic to have around, since its included XLR-to-1/8-inch audio cable plugs in to the video camera I use at work, giving me a choice of a either a lapel mic or a hand-held mic. I double-wind-screen for Meri since her “pphf” sounds are a little harsher than my own. She is also still rocking the RadioShack “Heavy Duty Microphone Stand with Cast-Iron Base” (~$30), though it may be time to upgrade her to the Samson boom stand — they are just so nice to have! Comfort galore!

    I guess the last thing to address is live recording and broadcasting that we occasionally do. Lately we have been using Stickam for no particular reason above any other service. We tend to broadcast Lo-Fidelity live more than anything else, mainly because it is just the two of us in one local recording area, so anything that happens can be broadcast with no extra effort — everything is right there in one place. When you start tying in things like Skype streams… sure, it can be done, but it requires more effort than it is really worth for such a budget setup like our own. Live recordings typically have two computers: one is a standard podcasting station like any other show, and the second is usually my laptop running the webcam. Our mixers have the “Tape Out” / RCA output that we typically use to output to the computer, but there is also the “Main Out” — I run a variety of cables and cord adapters to get that 1/4-inch stereo output down to an 1/8-inch plug. This runs to the line-in on my laptop, mirroring the exact same sound that is otherwise heading out to another computer for the main podcast recording. Sure, there is some (negligible) extra noise being introduced/lost going through all those adapters, but since that particular stream of audio is exclusively going to the live broadcast (and not the archived version for editing/release), it is not that big of a deal.

    The next upgrade is going to be the room in which we record. Since moving into the new house, all recording has been done up in our loft. This is where we keep the computers, the old TV, CDs, DVDs, etc. It is a fantastic location (minus all the cat destruction, like my poor chair), but it is in a very open area. Sound bounces all over the place. When we have any more than two people, it starts sounding very “airy” in the recording, both due to the number of people (and thus the number of mics to adjust and compensate for) and the voices bouncing along the ceiling and down to the living room.

    We have a finished basement with several rooms. Right now, “the brown room” (which is the second room off the main area) is a disaster of storage space. Boxes, appliances, and assorted things of nothingness take up all the space. It is perfect for a little recording studio, though. It is just the right size, the walls are not tall, the door can be shut… lovely!

    Our Wi-Fi reaches down there, and since an entire show can be done with just one computer, there is nothing stopping me now from cleaning up that space and creating a great little recording studio in my basement. I might even get some extra sound-proofing padding for the walls… can you imagine how hot looking that place is going to be?! Speaking of “hot”, that is another perk to setting up shop in the basement — heat rises, and our loft starts boiling in the summer. The basement? Cool as can be!

    I think that more-or-less covers how everything is rolling right now. Does anyone have any questions about any aspect, or better yet, suggestions on ways to do things even better? Specific articles to read to bolster some mad audio skillz? I still consider myself a total audio n00b, though I think I have a couple other skills that I have picked up over the last couple years that at least helps put together some decent shows…!

  • My Podcasting Setup

    My buddy Kevin has asked me a couple things about my podcasting equipment lately, so I decided it would be helpful to a few people if I just put it all out there. In the end though, I don’t know how “helpful” it will be, since anyone with more experience than me will see my utter incompetence with audio! I have next to no idea what I’m doing, but I’ve somehow managed to create shows that sound at least halfway listenable. You’ve already read about my “podcasting empire”, so feel free to check out any of the shows to get an idea for how it all sounds (keeping in mind that we record Lo-Fidelity over at Jeff’s on his computer, though it’s all my equipment + his own microphone).

    So back in mid 2005, I decided I was going to jump on this “podcast” bandwagon with Daizenshuu EX. I was looking for something “new” to try out, and I always liked doing things bigger & better with that site. For our first episode, I’m pretty sure I used a very cheap (~$10) headset I had lying around (which has since broken itself into a million pieces because it was so cheap). After that, I moved on to what most people seem to do when they have no idea: RadioShack!

    Before getting into that, I should at least mention the way I record things. With Daizenshuu EX, we try to have Julian on as much as possible (which can be difficult when he’s over in Japan, but we do our damndest). I have found that for me, the best way to record him on my computers has always been to have CPU #1 output Skype to CPU #2, which records Julian on his own audio track. You may hear Dave & Joel do a “1, 2, 3, *clap*” during their recordings; turns out we do a very similar thing. This lets me line up the claps on both audio tracks so I can edit them together in sync with one another. I actually do the clapping myself which gets recorded on both tracks. I know, I know… I just said that Julian gets recorded on his own track. Let me explain.

    My main computer is a Windows XP machine (started out using our Shuttle, but have since moved on to our big XPS; this doesn’t really matter, though). All of the recording stuffage from our local side goes into the “line in” port on the computer. Here are my audio properties while recording:

    You’ll note that the “Line-In” port is muted on the local side. This is a bit misleading. What it is actually doing is preventing any audio coming in over that port from being output from the line-out port. In a nutshell, it comes in (and gets recorded), but doesn’t go out. This allows me to:

    (1) Run Skype on CPU #1
    (2) Record myself on CPU #1
    (3) Only have Skype’s audio running over the line-out port to CPU #2

    Is this a great way to do things? Probably not. Are there better ways? Probably. It works for me, though. It allows me to have separate audio tracks for each of us, which means I can process the audio differently for each of us (there is more “clean-up” that needs to be done on Julian’s than on our own, mostly just due to it being over Skype).

    Right now I am outputting to a computer running Ubuntu, which itself records into Audacity, the same as on my Windows XP machine. In this particular case, the OS on CPU #2 is completely irrelevant… it just needs to record whatever I want to send to it.

    You might still be asking how I line up my own claps on both audio tracks if I don’t record myself on CPU #2. Easy. I temporarily “un-mute” that line-in on CPU #2, so I’m recorded on both tracks. Once I clap, I just turn it off and it’s back to Julian by himself being recorded on CPU #2.

    So let’s get back to equipment. After abandoning crappy headsets for an episode (or two; I don’t remember), I was off to RadioShack. I ended up getting their more basic equipment, which worked perfectly fine for a while. In fact, it still works, but we’ve since eclipsed the sound quality by miles.

    I started out with the RadioShack 4 Channel Stereo Sound Mixer ($30). It’s an incredibly basic little mixer that has four 1/4-inch inputs with their own individual volume controls, two sets of RCA inputs, and one set of RCA outputs. I have never really used those inputs, but the output goes from the RCA-to-1/8-inch (standard headset) adapter, which would be plugged into the line-in on CPU #1. For mics, I bought a bunch of their cheapest unidirectional dynamic microphones (~$20-30; similar item). Since everyone was recording into their own mics, unidirectional seemed the way to go (recording from just one, head-on direction). I eventually purchased their cheap omnidirectional microphone ($30), but never did much with it.

    That stuff worked for us for… well… I don’t even remember. Quite a long period of time. Maybe two years…? With a combination of tweaking levels and working with other software (things like Levelator), I was able to get it sounding halfway decent. There was a huge room for improvement, though, and once I realized we were actually serious about this, I decided to upgrade equipment.

    To this day, though, I still use their desktop microphone stands ($11) and gooseneck microphone extensions ($8). I also have their standard “Heavy Duty Microphone Stand with Cast-Iron Base” ($28), which is mostly used for playing Rock Band, though we also toss Jeff’s mic into it (since his mic doesn’t use a shock-mount like the MXL 990s). Definitely time to upgrade to some boom stands, though. Anyway…

    When it was time to upgrade equipment, I figured that since I didn’t actually know the technical ins-and-outs of audio, I should get some quality material, but not go completely overboard. After doing a bit of research, I ended up with the Behringer Eurorack UB802 ($60) for a mixer, and the MXL 990 condenser microphone ($50-70). I am able to get a really nice sound out of these, which is leagues ahead of anything I was able to get out of RadioShack equipment.

    That only covers me, though. What about Meri? What about other local guests? Well, I suppose I could have gotten the next step up with the Behringer mixers with additional XLR inputs for mics (I actually did get the 1202 for work earlier this year, which is great), but we have been able to manage. I tend to end up with Jeff’s microphone here a lot, so if it’s here, I toss it over to Meri (or I have another MXL 990 sitting around, which also works). For the record, Jeff has a Shure 8900 dynamic microphone ($50).

    More than two of us? That’s a problem, since the 802 only has the two XLR inputs, and I can’t get enough volume/gain out of the old RadioShack mics by plugging them directly into the 802. I need to pre-amp them with… gasp… the old RadioShack mixer.

    Yep. For right now, if I have three or more people locally recording, I use a combination of the Behringer and RadioShack mixers. The RadioShack mics go into the RadioShack mixer like always (and up to a volume of about three or four), which then gets output as a whole over to the “Tape In” on the Behringer mixer. That can allow me up to six people locally recording with their own microphones, though this is not an ideal situation. Any more than one extra mic starts to really contribute to extra noise, which is a real pain to deal with cleaning.

    So that basically takes us up to today and how we record shows. I do all of my recording into Audacity, and use a combination of its own noise removal filter and Levelator to balance out shows. I actually piece together segments with their bumper music over in Adobe Premiere, since I like the easy drag-and-drop of the timeline more than trying to do it in Audacity.

    My typical Daizenshuu EX workflow looks something like this:

    (1) Turn off cell phones, test levels, make sure everything’s recording on its proper audio track, etc.
    (2) Record actual episode
    (3) Export the two individual audio tracks from each computer
    (4) Toss each audio track into Levelator
    (5) Bring the levelated audio back into a new Audacity project
    (6) Run noise removal on each individual audio track
    (7) Drag both processed audio tracks into another new Audacity project
    (8) Line up the claps from each audio track
    (9) Edit episode
    (10) Export, encode, etc.

    There’s still so much for me to learn and things I specifically want to learn about, but it’s pretty daunting. I’d love to upgrade to a bigger mixer at some point. I would also love to learn about things like noise gates and compressors (I’ve had my eyes on the DBX 266XL Compressor Gate for a while; ~$120). I’ve heard Rym note a few times that for podcasting purposes, dynamic mics are better than condenser mics, so I’d like to investigate that a little more (I do think that my mic picks up more than it should and then messes with the balance a little bit; I also can’t wait to move and not have things like our current loud refrigerator always being picked up). I’d also like to move toward non-analog input. I’ve played with the Behringer U-CONTROL UCA200 USB Adapter (UCA-202; $30 sold separately) that came with the 1202 mixer, and it does help cut out a tiny bit of noise. Unfortunately, the USB interface seems to take over and negate what I’m used to doing with the muting input going to CPU #2, which totally throws off any Skype recording I would need to do.

    So that’s basically it! If anyone’s interested, I’d be more than happy to further explain how I do things, but I have to follow that up by saying that I literally have no idea what I’m doing and continue to be learning as I go along. I’d love additional suggestions and clarifications from people if you have anything to offer!